KTM Forums banner

Duke 390 2016 Complete engine rebuild (amateur)

48K views 49 replies 14 participants last post by  10trevorduke  
#1 · (Edited)
I bought a 2016 390 Duke a while ago (~16k km) and within 1 week of riding the engine broke. Brought it to two shops (even the KTM official one) and nobody could help me assess the problem. Most likely the engine ran without oil and has some internal damage. Happy to share more details if people are interested (I have the computer readout etc). I've decided to open up the engine and try to assess what is the problem. For my fellow KTM lovers - I will keep a bit of a diary here. Let me know if you have any questions - because there is so much more to share.

Printed the repair manual, chapter 16 how to disassemble an engine ... how hard can it be? o_O

P.S. I live in Hong Kong so space and access to tools is a constraint. We've also never worked on a bike before.

Image


We've stripped all the parts to get easy access to the engine. In the end it is held into the frame with two through bolts. It became apparent nobody ever properly services and maintained the bike.

94906


Here is the bad boy.

EDIT: When removing the timing chain - note the direction of travel and mark it - you need this later when putting it back.

94907


Pop the hood and make sure we know dead center for later.

94908


Hmmm, the bottom right valve has a lot of carbon compared to the other ones.

94909
94911


Lots of carbon here as well

94910
94912


Some oil compatible sanding paper later

94913
94914


Removing the clutch disks.

Well there is a 10 picture limit to post here. Next up is removing the clutch housing (which I broke..) and rotor.

Give it a thumbs up if you want more :)
 
#33 · (Edited)
The sealant worked pretty good. I hope the excess on the inside of the case will just burn/wash away. I will do an oil change after a 100km or something.

96093


Small part alert 🚨 I lost the gear indicator contact spring, which was located under the sensor pin (see below). When you remove the sensor be cautious to remove both the pin AND spring. It's a tiny 2mm spring, I didn't even know it was there... Now I have to order a new one.

Also, the manual does not describe the steps to put back the statur (electricity coil thing) into the engine case. Took me a while to figure out.

96095


Water pump and clutch plates are back in

96096


Piston rings ... just follow the instructions. It's a bit fiddly but very manageable.

96097


96098


A generic piston ring holder worked fine

96099


96100


96101


It was an absolute pain to put the piston lock rings in (connecting the piston to the crankshaft). The manual says that you have to put the open side of the ring at 6 o'clock. But after fiddling with it for almost an hour we finally got it in but it is stuck at 1pm. QUESTION: I can't move it anymore ... is this a big concern? It seems to be doing the job - I plan on keeping it at 1pm. I would really dread taking it out and trying it again.

Starting to look like a real engine again.

96102


The rebuild is almost coming to an end, now I need to finish to top end. Question: does anybody have a good resource on how to measure valve clearances? I have a feeler gauge but I have no clue on how to use it / where to stick it?

Question: I have new valves, but I am deciding if I should change them or not. The old ones look fine, and I don't want to screw around with something that doesn't need replacing. Also, it might screw up my shims (does it?) if I replace my valves.

EDIT: I found this video that explains how to check your valve clearance. And lo and behold, one of my valves is off (max clearance 0.18mm, mine measure 0.25mm ... ) How bad is this?

Another question, after tensioning my timing chain there is no play between the chain and the bridge. Is that supposed to be?
96107


Don't forget to put in your shims ... manual doesn't say to do that ... and I forgot so I had to take everything off again.
 
#34 ·
Wow man, this is pretty awesome.

If you have questions you are not getting answered here, there is a whole forum specific to the 390 Duke. It's called ktmduke390forum.com

It's much busier than this one too.

Sent from my VOG-L04 using Tapatalk
 
#36 · (Edited)
I haven’t gotten that far yet :)

We hanged the engine back in the bike the other weekend. I had to wait on some final parts (that gear indicator spring + water pump nut I lost). There were some shipping delays from USA.

Been struggling with the weather here in Hong Kong and the wiring is quite some work because I don’t remember all the electronics. So need to take a good weekend.

96410


The little spring ...
96411
 
#37 ·
To answer your question on ring gap spacing, it depends on the oil control ring scrapper positions as well. The goal is to get the ring gaps in a position that they aren't near each other so that you could prevent blow by and oil leak by.
As for the valves, if you are already in there and you have new valves I would go ahead and change them out. The reason why your gap in close is due to the valve stem itself stretching. which closes up the gapping.
 
#38 ·
Last week I finished the bike - and it's running like a charm! 👏

96685


Took me quite some time to mount all the cables and tubing back. If you are doing this - mark which cables are not connected to anything. Some cables are supposed to be loose/not connected.

When I started it and after the test drive it gave me the damn "Low Oil Pressure" warning again. Long story short, my oil filters were completely clogged again. Changed them out for new ones and put in the Motorex oil, and after that no issues.

So, better to buy two oil filters sets, and since KTM is such a drama queen it's better to use a cheaper oil to rinse the system and then put in the expensive stuff.

It will go to the shop this week for a check-up, will let you know the result.

Let me know if you want to know anything else, I will post a small guide, lessons learned and money spent soon.
 
#39 ·
Only just saw this post, so my comments are 'after the fact' and you've pretty much worked them all out by experience. Observations:

1. The problems you had unbolting stuff was due to KTM's love of using copious amounts of Loctite. There are 3 grades that I know of; pink (weak), blue (medium) and green or red (grips like a bastard). The only way to successfully free off parts assembled with green or red Loctite is by heat, and lots of it. It is only removable once cured by heating up parts to 450°F (232° C) for about 5 minutes. That's why those parts got mangled...

2. Whatever amount of gasket sealant appears on the outside of the cases will probably also be present on the inside of the cases. There is a danger of this coming loose and clogging up oilways. With luck it won't but it's better to use gasket cement sparingly, and run a thin line as close to the outside edge of the sealing face as possible. That way most of the surplus will get squeezed to the outside, where it can be cleaned off. You only need a very thin film to seal the cases.

But for someone coming to this problem with no experience, you did a brilliant job and kudos to you. You figured it out, didn't give in and you now have a working motorcycle again. Well done you!
 
#40 ·
Bad news ... my cylinder head / valves blew! Driving 70km/h and the engine just got stuck, shut off and refused to start. No warning or errors.

Opening the top-end. It looks like the valve lever (red) broke off with the spring stuck in the down position. Don't know if this is the cause or something else. I remember the valve clearance was a tad (~0.05mm) outside the range. This timing blew all the other valves. They were stuck in the piston.

97111


Piston is beyond repair
97108


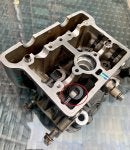
Looks like I have to replace this cylinder head.
97109


For your reference, this is how it looked before:

97112


I still have to check the piston housing and crankshaft for play....

Any thought what could have caused this? The bike had enough oil and didn't overrev
 

Attachments

#43 ·
Bad news ... my cylinder head / valves blew! Driving 70km/h and the engine just got stuck, shut off and refused to start. No warning or errors.

Opening the top-end. It looks like the valve lever (red) broke off with the spring stuck in the down position. Don't know if this is the cause or something else. I remember the valve clearance was a tad (~0.05mm) outside the range. This timing blew all the other valves. They were stuck in the piston.

View attachment 97111

Piston is beyond repair
View attachment 97108

Looks like I have to replace this cylinder head.
View attachment 97109

For your reference, this is how it looked before:

View attachment 97112

I still have to check the piston housing and crankshaft for play....

Any thought what could have caused this? The bike had enough oil and didn't overrev
It's so sad to see what happened after the rebuild. I hope the crankshaft was not damaged by this.
Do you think this had anything to do with no play in timing chain while you were putting it back?
 
#45 ·
This happened because the Rocker Arm Broke and got stuck, or either because of faulty valve Spring.

Now you gotta change the
Intake Valve
Exhaust Valve
Valve Spring Seat
Valve Stem Seal
Inner & Outer Valve Springs
Valve Spring Retainer
Valve Collet
Rocker Arm
Cylinder Head
Cylinder Piston Block

I advise you thoroughly check the timing chain, Cam Shafts, Valve Lever Shaft and Timing Chain tensioner for any damage.

The same problem happend to me because of a faulty valve Spring, the Cylinder Head, Valves, got damaged. Got to change everything because of that.

102354


102355


102356
 
#50 ·
And just for fun - this was the quote (in HKD - so divide by 8 for USD) they gave me for look at the bike. Later I found out they didn't even look at the spark plugs or throttle body ... just were just looking to charge me through the roof. And this is the official KTM shop... View attachment 95594
I had the exact same problem with my crankshaft. Bought a new one put it in went to start it and still getting water in the oil. Did you have the same problem?